Cake pop cupcake and flower blomst
I've made some translations in the text in this cake pop tutorial, because "google translate" has some errors when translating... an example is about how to smooth chocolate it says "keep licking"... and that is just NOT what i want you to do... I apologize beforehand for my, at times, grammatically incorrect English... practise makes perfect, right? :) The english version is placed after the danish.
Her kommer en tutorial om hvordan man kan lave en cake pop cupcake og en cake pop blomst.
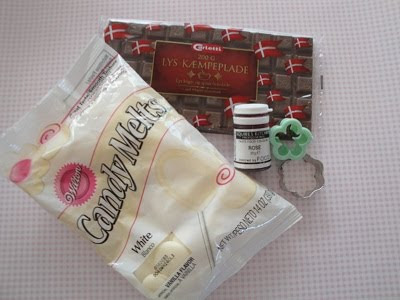 Til pynten har jeg anvendt den billige smelte og overtrækschokolade fra Carletti - den fungede rigtig godt. Til at få farvet toppen af cupcaken samt blomsten har jeg anvendt candy melts og "rose" farven. Udstikker til cupcaken er en småkage blomster udstikker (metal udstikkeren på billedet). Til blomsten har jeg anvendt en lillle 5 petal cutter (grønne udstikker på billedet)
I used milk chokolate for the "buttom" of the cake pop. For the top I used white Candy Melts which I coloured with "Rose" from Squires Kitchen. To shape the base of the cupcake cake pops I used a metal cookie cutter, the top i moulded with my hands - the top diameter has to be bigger than the base of the cake pop. For the flower cake pop I used a little 5 petal cutter.
 Først formes bundene til cupcake cake pop ved at udstikke dem med småkage udstikkeren. Dyp slikkepinden i smeltet chokolade og kom dem i cake pops. De skal herefter stå i køleskabet i ca 20 min eller i fryseren i ca 2 min.
Take the base/ buttom of the cake pop and insert a lollipop stick after coating the top of the sticks with chocolate. Now, put the cake pops in the refrigerator for about 20 min or in the freezer for about 2 min.
 Dyp bunden i smeltet chokolade og kom straks toppen på (se nedenstående billede). Sæt cupca cake pop på køl i nogle min i køleskabet til chokoladen er størknet.
JÆVN CHOKOLADE: Ofte kan man ikke få et jævnet chokoladen pænt ud på cake pop'en blot ved at dyppe i chokoladen. Hvis der ønskes et jævnt look som ovenfor skal man - efter at have dyppet cake pop'en i chokolade - holde slikkepinden i ca 80--85 graders vinkel og tappe på pinden med en finger. Derved kommer alt overskuds chokolade af og chokoladen bliver fordelt jævnt og pænt.
You are now ready to coat the cake pop base with chocolate. To make a smooth and even look, just tap gently on the lollipop stick after coating the cake pop. I hold the lollipop stick at approximately 80-85 degree angle when tapping with my finger. Put the top of the cake pop on now and let it dry together in the refrigerator for a couple of min.
 Toppen til cupcake cake pop. Du skal sikre at de er større i diameter end bunden og gerne lidt toppet.
 Toppen til cupcake cake pop. Du skal sikre at de er større i diameter end bunden og gerne lidt toppet.
The top for the cupcake cake pop. Make sure the diameter and height is bigger than for the base - this will give you the best result.
 Dyp herefter cake pop i rosa smeltet chokolade og kom straks krymmel på. Stil på køl indtil chokoladen er størknet.
 Dyp herefter cake pop i rosa smeltet chokolade og kom straks krymmel på. Stil på køl indtil chokoladen er størknet.
 Coat the top of the cupcake cake pop - exactly as you did with the base. Put sprinkels on.
 Samme fremgangsmåde som cupcake cake pop. Her er blot anvendt den lille 5 petal cutter til blomster.
 Samme fremgangsmåde som cupcake cake pop. Her er blot anvendt den lille 5 petal cutter til blomster.
To make a flower cake pop, proceed as you did with the cupcake cake pop - only difference is that you use a small 5 petal cutter to shape your cake pop, and you insert the lollipop stick in the side of the cake pop.
 Dyp blomster cake pop i den rosa chokolade, og find noget valgfrit krymmel som kan anvendes som midten i blomsten. Jeg har anvendt almindelig grønt gavebånd som blade.
 Dyp blomster cake pop i den rosa chokolade, og find noget valgfrit krymmel som kan anvendes som midten i blomsten. Jeg har anvendt almindelig grønt gavebånd som blade.
 Coat the flower and add sprinkels in the center and put some curling ribbon on the lollipop stick to make it look like leaf.
 Til sidst har jeg valgt at duste lidt farve på blomsten, blot for at give lidt mere effekt.
 Til sidst har jeg valgt at duste lidt farve på blomsten, blot for at give lidt mere effekt.
To get a nice finish i coloured the cake pop with "powder-colour" - I just dusted it on with a light touch.


Tak for tippet. Jeg MÅ altså snart få lavet nogen.
SvarSlet